
|
|
|
Blank Selection: |
|
Use a 3/4" square blank. |
You can make this pen with a blank that is 11/16",
but there is little room for error. If you make the pen with straight
sides, the cap body will be 0.59" in diameter. I recommend the blank be 3/4" in size. That will allow errors
when centering the drill bit and will help prevent side blow out when drilling the hole.
|
Use a 5" long blank.
|
You can use a blank shorter than 5", but as you approach 4.1" (the combined finished length of the pen sections) you will remove any spare length for errors. Your cuts will have to be square and with little kerf. You should be fine with any blank that is 4.25" or longer. Some of the tips below (especially for acrylics and difficult woods) really could benefit from a 5" blank. |
Preparing the Blank: |
|
Consider using CA glue to reinforce the blank. |
Some woods are very soft (spalted woods) or
fragile (cross grain woods). Soaking the blank with thin CA glue will strengthen the blank. Apply thin CA glue to the blank and let it soak
in to the wood. Give the CA a quick spray of accelerator to make sure
the CA has fully cured before you pick it up with your bare hands. You
will need to reapply the thin CA while turning (discussed in the turning
section).
|
Consider knocking the corners off the blank. |
This is especially useful with difficult materials (spalted woods,
cross grain woods, burls, acrylics, and many Amalgam-Mutt blanks). Use
a belt sander (or band saw or table saw) to remove some of the material from the corners so
that you end up with an 8 sided blank. This will reduce the strong
impact that the corners receive when first on the lathe.
|
Mark the length of the tubes on the blank. |
I use a black Sharpie to place a line on the blank where it needs to
be cut to fit the tubes for the pen.
For more precise cuts consider using a metal square to make a
perpendicular line (with a thinner marker or pencil) across the entire blank. Use X's to mark the excess
sections.
|
Mark the join and orientation of the two blank sections. |
To help insure that the blank is properly oriented
when turning and drilling I like to mark the blank with a sideways T as
shown in the photo below. By crossing the cut between the main body and cap sections
it helps align the blanks for drilling and orientation on the mandrel.
And the head of the sideways T shows which end is the cap.
|
Determine if you are going to cut the blanks or drill the blanks first. |
The most common method is to cut the blank into the two sections first, then drill the holes in each section. When working with acrylics or difficult woods the biggest drilling problem occurs when the drill exits the end of the blank material. By drilling the blank first, you can completely avoid having the drill bit exit the end of the blank. I will discuss both methodologies below. |
Cut the Blank into Sections First Method: |
|
Cut the blank into sections. |
Cut the blanks along the lines that you previously made. With
strongly grained woods (and most figured acrylics) you will want the grain lines
to line up between the two blank sections on the finished pen. Therefore
it is important to make straight cuts with as thin a kerf as you can. I
like to use a small benchtop bandsaw. The kerf is about 1mm. A straight
cut is important because if the cut is not straight you will end up
having to mill away all of the excess material to make the blank
straight. You may find it useful to use a cutting sled to help hold the blank while you are making these cuts. Plans for a sled can be found on the internet. |
Drill the blank section. |
Now you will drill the hole in each section for the brass tubes. I
like to drill from the common point of each section as shown in the
photo below.
For the main body, you can use a 27/64" drill bit, or for a closer fit you can use a 10.5mm drill bit. The fractional bit is slightly larger and is very useful if you have to paint the inside of the drilled blank. I personally use the millimeter bits. For the cap body, you can use a 1/2" drill bit, or for a closer fit you can use a 12.5mm drill bit. Again, the fractional bit is slightly larger. I have my drill press set at 1100 rpm and I use a blank vise that I purchased from Woodcraft to hold the blank in place. As you approach the end of the blank I would recommend that you go slower. Going too fast will exacerbate the problems of chipping and tearing on the grain at the point where the drill bit exits the blank. Going slow will minimize this. One way you can know that you are approaching the end of the blank is to use some acrylic paint to put a mark on the drill bit corresponding with the length of the brass tube/blank. As this mark approaches the blank you know you need to slow down.
Having the drill bit centered and straight is important to help the grain of the blank align between the sections. Sometimes if a blank has a flaw or an off-sided feature you may want to drill the hole off-center to miss the flaw or maximize the feature. Also, it is vitally important with some blanks like the SegAmal blank or the Xs & Os blanks. These blanks will really show any error. |
Drill the Blank First Method: |
|
Cut any excess material that is to the left of the nib. |
If you have a blank where there is excess wood to the left of the nib, you will need to cut that excess wood from the blank so that you can properly measure the depth of the hole. |
Drill the smallest diameter hole first. |
Drill the 27/64" main body hole first. That way if you drill too far
the cap body hole will be larger than the hole you have already drilled.
Make sure the blank and the blank vise is extremely secure. Any movement in the blank will make the hole larger than you intend. You can use a 10.5mm drill bit if you would like a closer fit. Having the drill bit centered and straight is important to help the grain of the blank align between the sections. Sometimes if a blank has a flaw or an off-sided feature you may want to drill the hole off-center to miss the flaw or maximize the feature. Also, it is vitally important with some blanks like the SegAmal blank or the Xs & Os blanks. These blanks will really show any error. See the photos at the end of the previous section "Cut the Blank into Sections First Method". After you have drilled a hole 2.1" deep you are ready to test the depth of the hole. |
Test the length with a tube. |
Knock any dust/chips out of the drilled hole and take a main body
tube and drop it in. If some of the tube is still exposed, drill the
hole deeper.
|
Cut the first section free. |
After the main body tube is fully contained by the drilled hole, take the tube and make a mark on the blank to indicate where you should cut. With strongly grained woods (and most acrylics) you will want the grain lines to line up between the two blank sections on the finished pen. Therefore it is important to make straight cuts with as thin a kerf as you can. I like to use a small benchtop bandsaw. The kerf is about 1mm. A straight cut is important because if the cut is not straight you will end up having to mill away all of the excess material to make the blank straight. |
Drill the larger diameter hole. |
Now take the remaining blank and a 1/2" drill bit and drill a 2"
deep hole. You can use a 12.5mm drill bit if you would like a closer
fit. Remember to keep the drill bit centered and straight. |
Test the length with a tube. |
Knock any dust/chips out of the drilled hole and take a cap body tube and drop it in. If some of the tube is still exposed, drill the hole deeper. |
Cut the second section free. |
After the cap body tube is fully contained by the drilled hole, take the tube and make a mark on the blank to indicate where you should cut. As with the first section take care to cut straight. |
Working with Acrylics? |
|
Do you need to paint? |
If you are working with an acrylic blank, many of them need to have either the tube or the inside of the drilled blank painted. Most acrylics are very translucent. This really adds to the beauty of the blank, but it also can reveal the brass tube that is inside the finished section. I have tried to indicate on the acrylic blanks that I sell on this site how translucent they are. With the Vail pen, you will need to be concerned with any blank that is Medium translucent or Higher. I do not think that every acrylic needs to be painted. Often the brass tube will just add a golden hue to the thinnest part of the finished section (near the post end on the main body). Painting the tube or the inside of the blank will change the color of the finished pen. |
Choose paint color. |
Choosing a white or lighter color will lighten the finished blank.
Choosing a black or darker color will darken the finished blank.
Sometimes you will want to change the color of the finished section.
Other times you won't want to change it. When that is the case, you will
need to choose an acrylic paint that is close to the color of the blank
you have.
I have changed to painting the inside of the blank anytime I feel that painting needs to be done. Painting the tube has several drawbacks: the paint can come off when you insert the tube, you can't scratch the tube to help it adhere to the blank, and on some of the more extreme translucent blanks you can see bubbles in the glue. By painting the inside of the blank, you will not see the glue or tube and you can still scratch up the tube to help in gluing. It is a little more difficult to do, but it is worth it. |
Paint the blank. |
I use acrylic paints that are readily available at any craft store and
many of the larger chains like Target and Wal-Mart. Using a small paint
brush, apply the paint inside the blank. I like to go about halfway down
the blank and paint towards the end. Rotate the blank until you have
that half of the blank done. Then flip it around and do the second side. Repeat for the other blank.
|
Glue the Tubes: |
|
Sanding |
Lightly scratch/sand around the brass tubes
(radial not lengthwise) with 100 grit sandpaper.
This will roughen up the surface of the tube to help the glue adhere.
|
Glue the tube |
I use thick CA glue to glue the tubes. I put a thin ring on the end of
the tube, then spiral the glue about 2/3 the way up the blank. Insert
the tube into the common end of the blank and twist while you push it
completely in to the blank. Twisting will help distribute the glue over
the whole area. I insert it on the common end so that I can make sure
the tube doesn't go too far down into the blank. You need to remove as
little blank material as possible on this end so that the grain will
align on the finished pen.
|
Square the Blank Ends: |
|
Difficult materials. |
If the blank you are working with is soft, punky, oddly grained, or cross grained you might want to soak the end of the blank with thin CA glue to reinforce that wood prior to milling the end. Just make sure that you do not get any glue down into the tube. That will interfere with putting the tube on the bushings for turning and with final assembly. If some glue gets down in the tube, use a sharp edged knife or screwdriver to remove the glue after it has hardened. |
Remove excess material. |
After the glue has hardened, you are ready to mill the ends. If
there is a large amount of excess material on the end of the blank you
may want to sand or cut some of that excess material away. Mill as
little as possible to preserve the sharp edge on the mill.
|
Mill the ends. |
Put the appropriate sleeve on the mill pilot shaft and insert it
into the tube. Mill the end of the blank until you reach the brass tube.
Flip the blank over and mill the other side. Repeat for the other blank.
If you find that you have to press hard, your mill may need to be sharpened. Search for a sharpening service in your local Yellow Pages or ask at a local wood working store. A dull mill can crush the grain and this can be visible in the finished pen. |
Mark the Tube Interior: |
|
Use a marker to mark the common end of the blanks. |
Previously you marked the common end of the blanks with a line on the
exterior of the blank. Now you are ready to turn the blanks down and
that line will disappear. I like to mark the inside of the tubes with a
small black line to mark the common end. This will help when you are
ready to assemble. The cap body of the Vail is straight and you can
sometimes forget which end is which when you go to assemble.
|
Mandrel Setup: |
|
Orientation of the bushings and sections. |
I like to make my pen with the post end towards
the headstock and the cap end towards the tailstock. Take the smallest
bushing (xxxx) and place it on the mandrel with the lip towards the
tailstock. Put the main body blank on (with the common end towards the
tailstock) the mandrel and onto the lip of the first bushing. Place the
next smallest bushing (xxxx) on the mandrel with the lip towards the
main body blank and insert the lip into the main body blank. Take one of
the two cap bushings (they are both xxxx) and place it on the mandrel
with the lip towards the tailstock. Put the cap body blank on the
mandrel with the common end towards the headstock and put it on the lip
of the bushing. Take the final bushing and insert the lip into the main
body blank on the mandrel. Now tighten the nut (finger tight only) on
the mandrel shaft and bring the tailstock up to the end of the mandrel
shaft.
|
Consider marking the bushings. |
The bushings are very similar in size. I like to
take mark the bushings with the order that they go onto the mandrel. You
can either use acrylic paint to put a mark on the bushing, or make a
radial gouge in the blank with an old flat head screw driver. In the
case of the Vail, you only need to mark one of the lower barrel
bushings. The cap body bushings are both the same size so they do not
need to be differentiated.
|
Out of round problems & solutions. |
One of the most common problems when making a pen
is where the pen blank ends up being turned in an oval shape instead of
completely round. You can some out of round problems prior to turning if you lightly place a straight object (I use
the shaft of an old screw driver) on the bushings. If the object
bounces, your mandrel shaft is out of round. This can be from many
different sources: Is your mandrel shaft bent? Roll the mandrel shaft along a flat surface. If it wobbles the mandrel shaft is bent. I recommend the high precision mandrel shafts that I sell. They are stiffer than any other mandrel shaft out there. Is the mandrel shaft nut too tight? Make sure that you only tighten the mandrel shaft finger tight. Too tight and the mandrel will flex to relieve the stress. Is the tailstock to tight on the mandrel shaft? Do not over-tighten the tailstock against the mandrel shaft. It should be tight enough to securely hold the mandrel, but no tighter. Are the blanks milled square? Make sure that the ends of the blanks are milled square to the brass tubes.
If you test the mandrel shaft prior to turning and it is running true, but you end up with an out of round blank you have two possibilities. Are you using too much pressure with your turning tool? If your turning tool is dull you will have to press harder into the blank material. Keep your tools sharp. Are you sanding too much? Using sand paper can result in an out of round blank with some woods. The sand paper will remove less material on the sides where the grain is coming out of the wood. Try to use as little sand paper as you can. |
Turning: |
|
|
|
It is beyond the scope of this instruction page to go into turning methods. I would recommend any of the books or videos that I sell. However there are two tips that are worth discussing. |
Push tool towards center. |
When turning difficult woods, you should push your
turning tool towards the center of each blank. Pushing the tool from the
wood towards the bushing puts some additional stress on the wood at the
end of the blank where there is little to no support. This is especially
true with angle or cross grain cuts.
|
CA reinforcing. |
Also when you are working with difficult woods,
you can use thin CA glue to reinforce the blank. Cover the blank with
thin CA glue and allow it to harden (use a CA accelerator to speed this
up) then remove some of the material. With the most difficult woods you
may have to reinforce many times as you turn the blank down.
|
Finishing: |
|
Sanding. |
As noted previously, you want to sand as little as
possible. After much practice, you may be able to skip sanding entirely
and go directly to Micromesh. Determine what grit of sandpaper you need to start with. In the beginning you may even have to start with 120 grit paper. Proceed through all of the grits to 400 grit or finer. If you are working with an acrylic blank some of the higher grits can cause a problem. The fine acrylic powder can actually melt onto the blank. I generally stop at 320 with acrylics or if you can turn it well enough you can skip sanding. |
Micromesh. |
I have cut all of my Micromesh pads in half. The
2" size is a little larger than I like to work with. I also mark the
edge of the pads to note the order of the grit.
Start with the coarsest grit pad. Hold the pad behind the blank and keep the pad moving up and down and sideways as you sand the blank. Leaving the pad (or an acrylic blank) in one place for too long can melt either the blank or the pad or both. After you are done with that grit, I like to turn the machine off and run the pad lengthwise on the blank a few times. Turn the lathe back on and with a wet (denatured alcohol is best) paper towel, remove the dust from the blank. Continue this process through all of the Micromesh grits. If you are making an all acrylic blank, you can skip the CA/BLO finish and go directly to buffing. The CA/BLO finish is not needed.
|
CA/BLO. |
See this instructional video for the best
explanation of the CA/BLO finishing technique.
I have two suggestions to add to that video. When applying the CA, do not press too hard. Pressing too hard will remove almost all of the CA and you'll have to put on a lot more layers of CA. Also, after a few coats of CA, if you have any valleys that were created on the blank, you can turn the lathe off and run the paper towel with a bit of CA lengthwise along the blank to help fill in those valleys. If you do the technique properly you should not get valleys, but this lengthwise application will help fill those valleys when you do get them. |
Buffing. |
I take the finished blank to my buffing machine. I
have one that is used with silversmithing, but you can find buffing wheels for
your lathe as well.
Using a product called Zam, I buff each blank twice. Apply the Zam to the buffing wheel. Hold the blank at a slight angle and move it across the buffing wheel. Rotate the blank about 1/8 or 1/6 of the way and repeat. Continue until the whole blank has been buffed. Apply more Zam to the buffing wheel, and repeat the process with the blank facing the opposite way. Go quickly and do not use much pressure. Too much pressure or time and the acrylic or the CA can melt. Also be careful of the ends they are specially sensitive to melting. Repeat for the other half of the blank. |
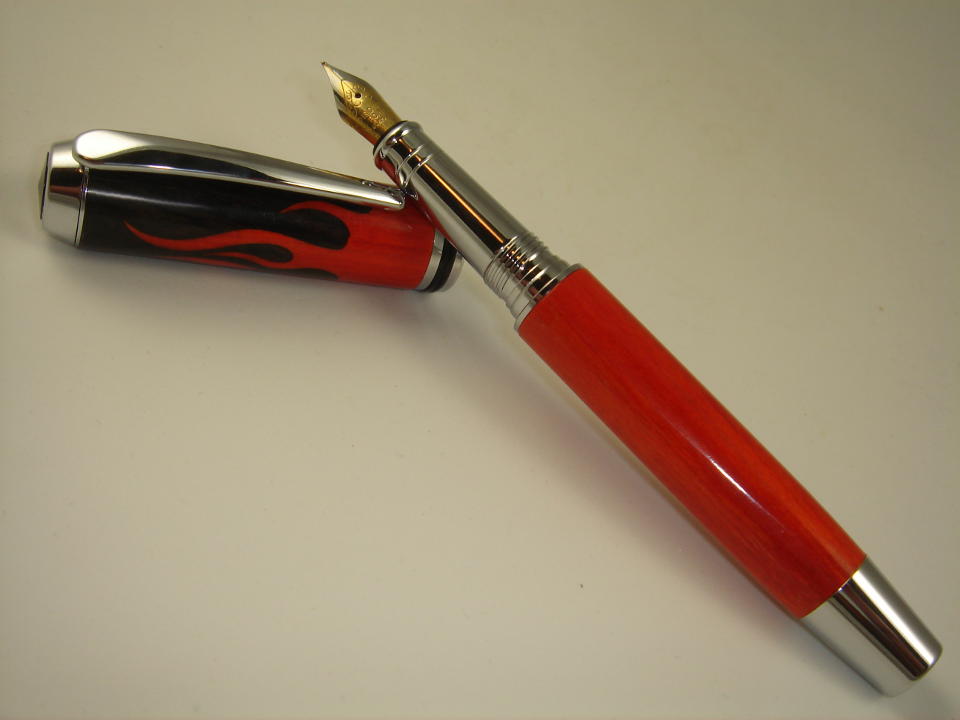
Assembly: |
|
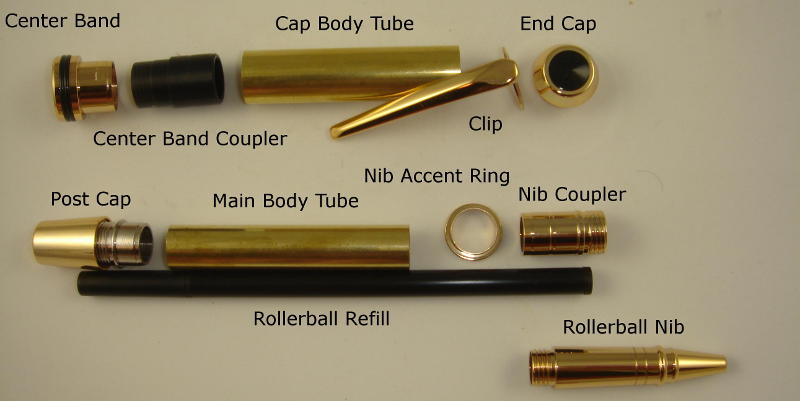
Attach the post cap. |
Leave the post cap partially threaded (as it comes in the kit) and press the post cap assembly into the smallest diameter end of the main body blank section. Screw the post cap all the way down to the wood. If you marked your tubes as recommended, this is the unmarked end of the main body blank section. |
Assemble the nib coupler. |
Slide the nib accent ring onto the unthreaded end of the nib coupler with the flat side of the ring pointing away from the threads of the nib coupler. |
Attach the nib coupler. |
Press the nib coupler assembly into the remaining open end of the main body blank section. |
Attach the nib. |
Rollerball Only: Remove the cap from
the rollerball refill and place it into the main body with the nib of
the rollerball pointing out. Screw the rollerball nib into the nib
coupler. Fountain Pen Only: If you plan on using the pen immediately, attach the ink cartridge or the ink pump to the nipple on the threaded end of the fountain pen nib. If you do not plan on using the pen, do not attach the ink cartridge. Screw the fountain pen nib into the nib coupler. |
Assemble the center band. |
Press the small diameter end of the center band coupler into the small diameter opening of the center band. |
Attach the center band. |
If the blank has a pronounced grain, you can assure that the grain is lined up when the pen is closed by fully screwing the center band assembly onto the nib coupler of the main body, then align the grain of the two blanks and partially hand press the center band coupler into the cap body. Carefully unscrew the loosely joined center band/cap body (taking care to not move the center band) and finish pressing the center band coupler into the cap body. |
Assemble the clip. |
Slide the clip onto the end cap and press the end cap coupler (the larger diameter end should point towards the clip ring) onto the end cap. |
Attach the clip. |
Align the clip in the position you desire and press the clip assembly into the remaining open end of the cap body. To protect the cap body during this step, consider using one of the plastic bags to form a barrier between the clip and the body. |
Screw the cap to the body. |
The cap threads have three points where they can begin to thread onto the main body. You may need to rotate the cap and choose a new starting point to get the grain to line up. |
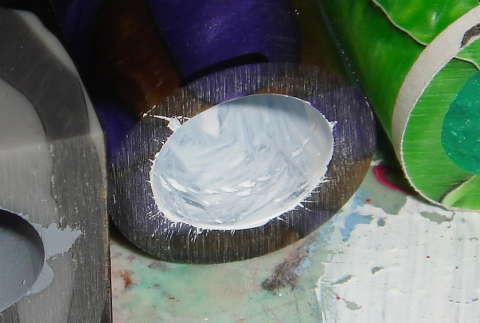 This image shows the 12.5mm hole in a 19mm (3/4") blank.
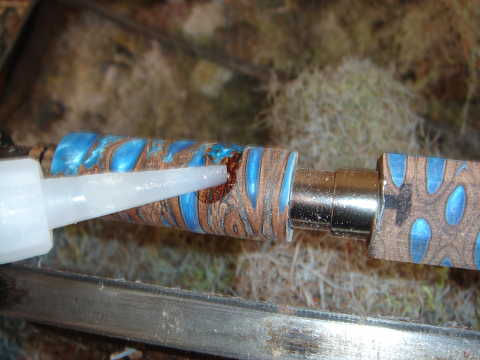 Using CA glue to strengthen a delicate blank.
 A blank with the corners sanded away.
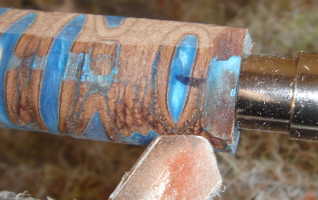
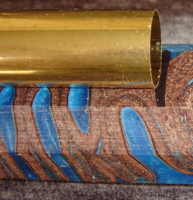 Marking the end of the tube on the blank for cutting.
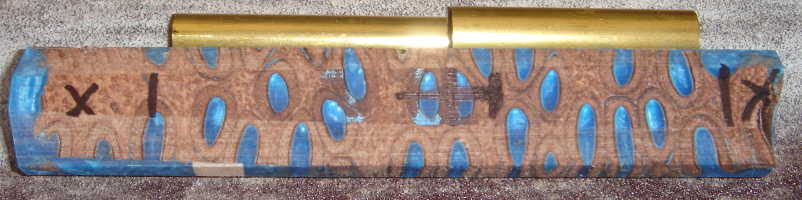 A fully marked up blank.
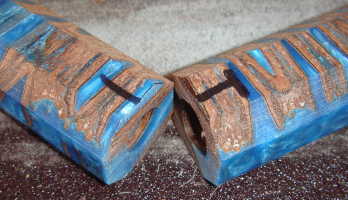 The common point of a blank.
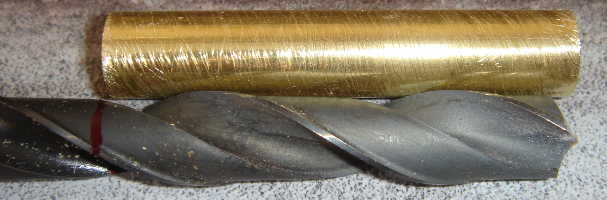 A drill bit marked for depth.
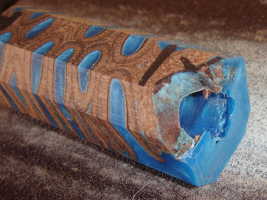 A blow out caused by the drill exiting the blank too quickly.
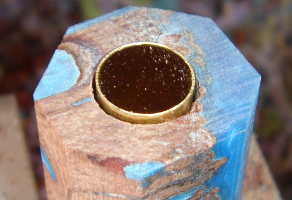
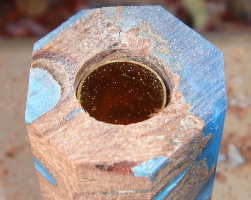 The hole is not deep enough on the photo to the left.
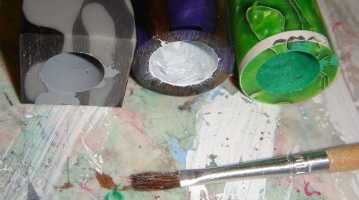 Choosing the right color to paint tubes. Gray and green are chosen to
limit the color change. What was chosen to lighten the final product.
Choosing the right color to paint tubes. Gray and green are chosen to
limit the color change. What was chosen to lighten the final product.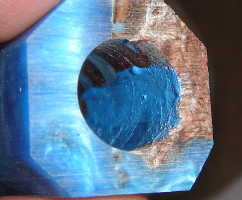 The start of painting the inside of a blank.
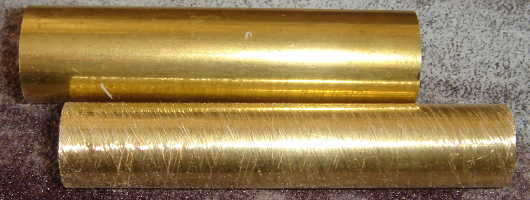 Unscratched and scratched tubes.
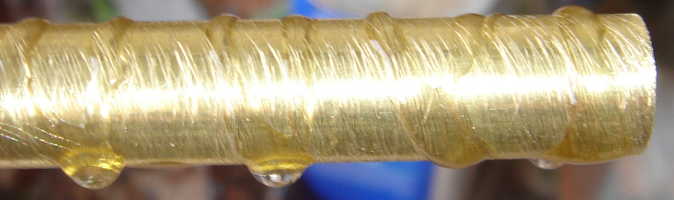 Plenty of thick CA glue on the tube.
 A glued tube in the blank with little excess wood to remove.
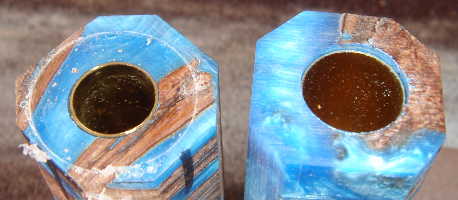 A milled and unmilled blank end.
 Blank with mill sleeves (main body on the left and cap body on the
right).
Blank with mill sleeves (main body on the left and cap body on the
right).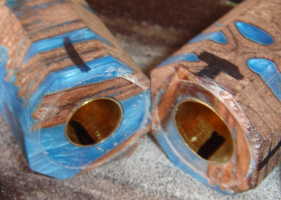 The common end of the blanks marked inside the tube.
 The vail mandrel setup.
 The mandrel setup with dimensions.
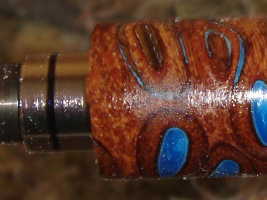 The smallest (post cap) bushing marked with a sharpie.
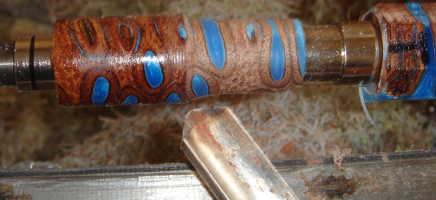
 Turning towards the center is recommended. Otherwise a chip out like the
one in the photo on the right can occur.
Turning towards the center is recommended. Otherwise a chip out like the
one in the photo on the right can occur.